Adding Different Units |
Top Previous Next |
Adding Different Stock Units on the Cost and Selling Prices Tab
The Multiple Units of Measure feature allows you to define various stock units for purchasing and selling inventory items. This ensures seamless stock management, even when buying and selling in different units.
Purpose
•Automatically calculates cost and selling prices for different units.
•Ensures accurate stock tracking with multiple barcodes.
•Prevents pricing errors by assigning different markups per unit.
•Seamlessly integrates into Smart-IT’s stock management system.
•
When an item is purchased in bulk and then broken into separate packs / sub items that are then sold as individual products.
For example, you can sell beer by:
•Single bottle (1 unit)
•Six-pack (6 bottles)
•Crate (24 bottles)
Each stock unit can have its own barcode, enabling accurate stock tracking and consolidation. You can purchase beer by the crate but sell it in any of these units, and Smart-IT will automatically handle stock calculations.
Additionally, you can assign different prices for each stock unit, such as setting specific prices for a single bottle, six-pack, and crate.
In the example below, let’s assume a beer costs $5.
Step 1 |
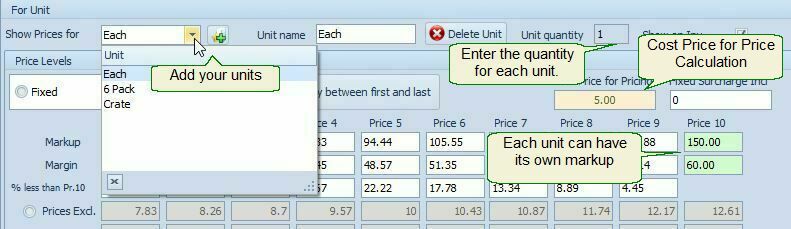
Add stock units and set the buying unit.1.Add all your units, (e.g., each, six pack,crate, box). 2.Specify the unit quantity for each unit. •Click the •The default unit (each) will be replaced with a new unit. •Change the unit name to Crate and set the Unit Quantity to 24. •Repeat this process for the six-pack (set to 6 units).
|
Step 2 |
Set Buying Units and Verify Cost Prices1.Change the Buying Units to Crate ( 2.The Supplier List Price will automatically adjust to the crates cost, in this instance $5 x 24 = $120 3.Test: Change the Show Prices for to each ( 4.Repeat this for the six pack and crate to ensure that the Cost Price For Price Calculations updates correctly: •Each bottle: $5 •Six-pack: $30 (6 × $5) •Crate: $120 (24 × $5)
❖ Note: The Supplier List Price always reflects the buying units.
|
Step 3 |
Set Selling Prices for Different Units (Example: Single, Six Pack and Crate.)
1.Deselect "Use Group Pricing" 2.Choose between Fixed or Markup Pricing If Fixed, select whether to enter prices as Exclusive or Inclusive.
3.In "Show Prices For", choose the unit (e.g., each, six-pack, crate) and enter: •The markup percentage OR •The specific selling price ($ value).
|
Step 4 |
Set Barcodes for Different UnitsEach unit can have a unique barcode for accurate tracking.
1. Go to the Stock > General tab 2. Click the 3 dots ( 3. The barcode entry form will open.
4. Enter the barcode for each unit (e.g., six-pack, crate) and select the corresponding unit.
|