Bank Manager |
Top Previous Next |
Hover the mouse over the different menu options. If the cursor changes to a hand ( ), then click to go to the subject.


Bank Manager
Go to Ledger> Bank Manager
Watch the video: Bank Manager
The Bank Manager allows you to import electronic bank statements (OFX or CSV format) and compare them with your internal Smart-IT transactions.
It helps you identify matching transactions, reconcile bank entries with existing General Ledger transactions, and post new transactions directly from the imported bank statement.
The Bank Manager supports manual reconciliation, automatic posting using predefined Bank Matching Rules, and bulk posting of multiple transactions.
For Bank Manager options go to Ledger > Account Options.
Note: The reconciliation process works the same in Desktop Version 2 and Cloud Version 3.
1. Setting Up Your Bank Accounts
Before importing bank statements, you must set up your bank accounts in the Bank Manager.
To add a bank account:
1. Go to Ledger> Bank Manager.
2. Click the green +  icon next to Account dropdown.

3. Enter the following details:
•Name: Enter a description for the bank account..
•Account number: Enter the bank account number.
•GL Account: Select the associated General Ledger bank account..
•Matching Algorithms: Select the algorithm Smart-IT should use to identify matching transactions.
oFITID: Transaction identifier from the bank feed (Note: some banks give duplicates or change IDs in subsequent statements).
oFUZZY: Uses date, amount, and description to uniquely identify. (Note: If transaction with same amount and description happens on same day)
oHASH (Default): Uses the transaction date, amount and position of the transaction within the day to identify transactions.
•Active: Deselect this option to hide a bank account that is no longer in use.
•Branch: Select the default branch for this bank account..
•Sort Order: Specify the order in which bank accounts appear in the dropdown list.
Direct Bank API Feed
A direct API bank feed is available, allowing transactions to be retrieved through a bank connection.
To arrange the connection, contact support@smart-it.co.za
2. Importing & Reconciling Bank Transactions
Importing a Bank Statement
Before importing, download your bank statement from your bank in OFX or CSV format and save it to your computer.
To import a bank statement:
1. Go to Ledger > Bank Manager.
2. Select the bank account you want to reconcile from the Account dropdown.
3. Click either OFX or CSV, depending on the format of your downloaded bank statement.
4. Select the bank statement file to import.
5. Smart-IT will import the transactions and display them in the transaction grid.
The system will automatically populate the relevant reconciliation information.
Understanding the Bank Manager Screen
The following fields provide an overview of your bank and General Ledger balances.
Date Range
The date range is determined by the transactions contained in the imported bank statement.
Opening Bank Balance
The opening bank balance is calculated using the ending balance in the imported OFX/CSV file.
If the imported date range includes transactions that have already been reconciled, the opening General Ledger bank balance may be affected, resulting in an opening difference.
You can disregard this difference if the Running Total Bank matches the Closing Balance Bank. It will not prevent you from completing the reconciliation.
Opening GL Balance
Displays the opening balance of the General Ledger bank account.
Opening Difference
Displays the difference between the Opening Bank Balance and the Opening GL Balance.
Normally, this amount should be zero.
An opening difference does not necessarily prevent you from completing the reconciliation. If the Running Total Bank matches the Closing Balance Bank, you can proceed.
Unreconciled GL
Select the Unreconciled GL Details tab to view individual General Ledger transactions that have not yet been reconciled.
This tab displays manually posted cashbook journals within the date range of the imported bank statement that have not been matched to bank transactions.
As you reconcile transactions, the corresponding entries will be removed from this tab.
Closing Balance Bank
Displays the closing balance retrieved from the imported OFX file.
Important: Some banks supply today's closing balance in the OFX file, regardless of the date range selected when downloading the statement.
For example:
Today is the 28th, and your bank balance is R7,500. You download a statement covering the period from the 1st to the 20th.
If the bank supplies today's closing balance in the OFX file, Smart-IT will display R7,500 as the Closing Balance Bank, even though this is not the balance as at the 20th.
In this situation, you can disregard the difference caused by the bank supplying the current balance.
Closing Balance General Ledger
Displays the General Ledger bank account balance as at the last date of the imported statement.
Closing Difference
After all transactions have been reconciled, the closing difference should be zero.
If there are unreconciled transactions, the closing difference will reflect the outstanding amount. An opening difference may also contribute to the closing difference.
The calculation is:
Closing Difference = Closing Balance Bank - Closing Balance GL ± Unreconciled Transactions ± Opening Difference
Hover the mouse over the different fields on the form. If the cursor changes to a hand () , click to get more information.

3. Four Methods of Reconciling Bank Transactions
Smart-IT provides four methods for reconciling imported bank transactions.
Method 1. Manual Reconciliation
Manual reconciliation allows you to review each imported bank transaction individually and either match it to an existing General Ledger entry or create a new journal entry.
Advantage: You can attach the supporting source document immediately using the Document Image button.
To reconcile transactions manually:
1. Select a transaction from the imported transactions grid on the left.
2. If a matching journal exists, view it in the Existing GL Entry pane. Click Save to reconcile.
3. If no match is found:
•Use the New Journal Entry pane to post the entry manually (assigning either to GL, Customer, or Supplier). See image below.
•Click Post To GL [F9] to post the transaction.
4. If you have not already attached the supporting document, use the Document Image button in the right-hand pane to attach it to the journal entry.
Tips
•Use the Quick Rule button to quickly create a Bank Matching Rule for future transactions.
•While reconciling, check that the Running Total Bank column agrees with the running balance on your bank statement.
•If you want to reverse a Bank Manager transaction: Select the transaction then click the Delete button.
|
GL Account: If it is a cash book posting. Supplier: If it is a supplier payment. Customer: If it is a customer payment.
Click the Post To GL button to post the transaction. The transaction will now be marked as reconciled and removed from the Unreconciled GL Details tab. |

Method 2. Auto Post
Auto Post automatically processes selected bank transactions.
Smart-IT will first attempt to match transactions using existing Bank Matching Rules. If no rule matches, it will try to identify a previous transaction with a similar bank statement description and amount.
Important: Auto Post may occasionally identify an incorrect match. If you want to prevent Smart-IT from using approximate matches, use Auto Post (Rules Only) instead.
Already-posted transactions will not be posted twice.
The Reconciled column indicates which transactions have been reconciled and which are still outstanding.
To use Auto Post:
1. Select the required imported transactions by clicking Select All, or select individual transactions.
2. Click Auto Post.
3. Smart-IT will process the selected transactions using Bank Matching Rules and its additional matching method.
4. Manually reconcile any transactions that remain unmatched.
Troubleshooting: Auto Post Does Not Process Transactions
If Auto Post does not process transactions, check whether the posting date is restricted.
Go to: Ledger > Account Options > Not Allowed To Post After This Date.
Check that the posting date falls within the permitted date range.
Method 3 . Auto Post (Rules Only)
Auto Post (Rules Only) works in the same way as Auto Post, but only processes transactions that match existing Bank Matching Rules.
It does not attempt to identify transactions using approximate description and amount matching.
To use Auto Post (Rules Only):
1.Select the required imported transactions by clicking Select All, or select individual transactions.
2.Click Auto Post (Rules Only).
3.Smart-IT will process only transactions that match existing Bank Matching Rules.
4.Manually reconcile any remaining unmatched transactions.
When should you use this option?
Use Auto Post (Rules Only) when you want to ensure that Smart-IT only processes transactions based on rules you have specifically configured.
This reduces the risk of incorrectly matching transactions.
Method 4: Bulk Bank Reconciliation (For Accountants)
Bulk Bank Reconciliation is particularly useful for accountants who process bank transactions for multiple clients.
It allows you to select multiple transactions with the same description or nature and post them together to a single General Ledger account, Customer or Supplier account.
Most businesses will generally use Manual Reconciliation or Auto Post (Rules Only).
Accountants who process their clients' journals and do not use Bank Matching Rules may find the Bulk option more convenient.
To perform a Bulk Reconciliation:
1. Filter transactions using the search row and click Select All.
Important: All selected transactions will be posted to the same General Ledger account, Customer or Supplier account. Make sure you have selected only transactions that belong to the same account.
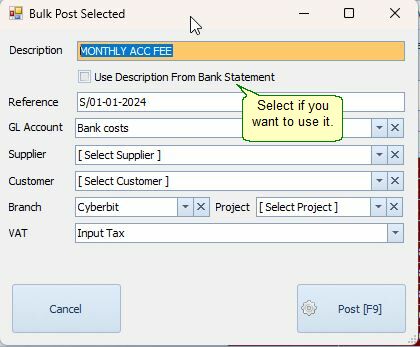
2. Click Bulk to open the Bulk Post Selected screen.
3. The Description field will automatically be populated using the description of the first selected transaction.
For example: Monthly Acc Fee.
4. Select the Description From Bank Statement option:
• Enabled: Each journal entry will use the description from its corresponding bank statement transaction.
• Disabled: All journal entries will use the description entered in the Description field.
5. Select the target General Ledger Account, Customer, or Supplier.
6. Click Post to process the selected transactions.
4. Checking Your Reconciliation
After completing the reconciliation, check for any outstanding or incorrect transactions.
Unreconciled Transactions
Select the Unreconciled GL Details tab to view manually posted cashbook journals within the imported date range that have not yet been matched to bank transactions.
As transactions are reconciled, they will be removed from this tab.
Depending on the circumstances, you can:
•Delete incorrect transactions.
•Create an adjustment journal and reconcile the transactions manually.
General Notes About The Bank Manager
Date Differences Between the Bank Statement and General Ledger
This section is particularly relevant to businesses that post their transactions through the Cash Journal before performing the bank reconciliation.
Many larger businesses follow this process, while smaller businesses without accountants sometimes prefer to import their bank statements and post transactions directly through the Bank Manager.
Normally, the transaction date on the bank statement should match the date of the corresponding General Ledger transaction.
If the dates differ, Smart-IT may not identify the transactions as a match.
here are two ways to deal with date differences.
Option 1: Allow for Date Differences
You can configure Smart-IT to allow a specified number of days' difference when matching transactions.
To configure the date range, go to: Account Options > Existing GL Entry - Day Range Around Transaction To Show.
Set the required number of days.
Example: If the date range is set to 3 days, a bank transaction dated 17/12/2026 can match General Ledger entries dated between 14/12/2026 and 20/12/2026.
Option 2: Correct an Incorrect Transaction Date
If an existing General Ledger transaction has an incorrect date, you can correct it as follows:
1. Open the Ledger Detail.
2. Locate the transaction you want to correct.
3. Right-click the transaction and select Correct This Entry.
4. Change the transaction date.
5. Click Process.
6. Close the Corrections form.
7. Return to the Bank Manager form and click Retrieve to refresh the transactions.
8. Continue with the bank reconciliation.
Duplicate Journal Entries
Be careful not to post duplicate journal entries.
Duplicate postings can cause differences between your bank statement and the General Ledger closing balances.
If a duplicate journal entry has been posted, identify the incorrect entry and delete it using the appropriate correction procedure.
Special Cases & Adjustments
Transfer Between Bank Accounts
Do not post transfers directly between bank accounts through the Bank Manager, as this creates BMD tags.
Instead, use one of the following methods:
•Post the transaction beforehand through the Cash Journal.
•Use a suspense account, such as Inter-Account Clearing, when processing the transaction through the Bank Manager.
Splitting a Bank Transaction Between Accounts
Sometimes a single bank transaction needs to be allocated to more than one General Ledger account.
For example:
A bank transaction of R5,000 consists of:
Electricity: R3,000
Property Taxes: R2,000
To split the transaction:
1.Select the bank transaction you want to split.
2.In the New Journal Entry pane, change the amount to R3,000 and assign it to the General Ledger Account (Electricity).
3.In the Match/Split pane (highlighted in red in the image above), click the Green (+) button.
4.Smart-IT will automatically add the remaining R2,000 as a second entry.
5.Assign the second entry to Property Taxes General Ledger account. Select the correct VAT type for each entry.
6.In the Match / Split form, select and post the first entry, followed by the second entry.
Important: The bank transaction will only be fully reconciled once the total of the split entries equals the original bank transaction amount.

|
|

 Troubleshooting Minor Discrepancies (Differences Under R5)
Sometimes a bank transaction and its corresponding General Ledger entry differ by a small amount.
For example:
•Bank transaction: R927
•General Ledger transaction: R930
•Difference: R3
The Bank Manager allows you to handle small differences by creating an adjustment entry.
To correct a small difference:
1.Select the bank transaction in the imported transactions grid.
2.In the Existing GL Entry pane, open the GL Detail Entry dropdown and select the unreconciled transaction to copy it to the New Journal Entry screen.
3.Click the Green + button in the Match/Split screen to automatically add the difference adjustment entry. (Our example: R3 will be posted).
4.Click Post to GL, then click Save to reconcile.
Example:
The bank transaction is R927, while the existing General Ledger transaction is R930.
Smart-IT will create an adjustment entry for R3.
The original R930 General Ledger transaction and the R3 adjustment will then be reconciled against the R927 bank transaction.
Note: Only transactions with differences of less than R5 are displayed by default. You can change this value in the Bank Manager Options.
Alternatively: Correct an Incorrect General Ledger Amount
If the amount recorded in the Bank Manager is incorrect because the original General Ledger transaction was posted incorrectly, you can correct it as follows:
Open the Ledger Detail.
1.Locate the incorrect transaction.
2.Right-click and select Correct This Entry.
3.To delete the transaction, click Delete Audit Trail.
4.Go to the Cash Journal and re-enter the transaction correctly.
5.Return to the Bank Manager.
6.Click Retrieve to refresh the data.
7.Continue with the reconciliation.
|
|
Disable Auto Fill
By default the detail will be filled in automatically.
You can disable this in Ledger Account Options.
The same functionality is always available by clicking on the Auto Fill button.
https://bit.ly/SI_Bank_Manager
